Thursday, May 31, 2012

Pin-ed It, Made It 06/01


 I know you're probably wondering where I've been for the last week. This is the craziest week of my entire year! This weekend the choir I sing in is putting on 2 huge concerts of hit radio songs (so fun!). And my in-laws are coming to stay with us and hear the concert (that's the lowest stress of the whole thing). BUT, since they were coming for the concerts I didn't want to make them come back in a week or two for a birthday party or have to miss one. SO, I got this brilliant idea to do Mady's birthday party the same weekend. Oh goodness. It's been nutty. But I have LOTS to show you next week. :)


Now let's get on with today's post...


_________________________________________________________________________________


Can’t believe that its already been 20 weeks of linky fun! So I thought it would be fun if I (Jennifer) showed you my latest pinterest fail!
Inspiration:
ombre sparkle nails
Jennifer Salter via Ryan Birchall onto Fashion I Love from: http://thebareintimates.com/nailed-it/
Reality:

Ummm…. yeah… not so fantastic! Maybe I’ll have better luck next time…. Maybe!

On to the Party!!!

pined_it_made_it_button175x175

Top Viewed:
Strawberry Fruit Leather

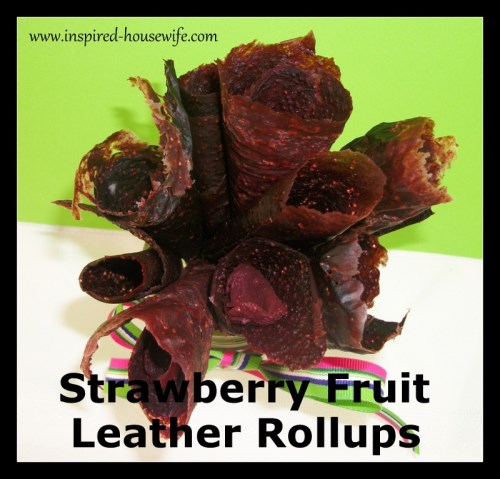
Strawberry Fruit Leather Rollups from Inspired Housewife!
 
Jennifer’s Pick:
I'm a smoothie-a-holic! And these sound Delish! So glad that Three Years Down shared this!
 
Meig & Brandi’s Pick:

We LOVE these bacon meatballs from Mamal Diane! We're big fans of anything that has bacon in it and Brandi makes an awesome chili with bacon and beer. Yum! We also think it's cool that she's from Ohio! We love seeing things from other Ohioans. Thanks for sharing!

Melanna’s Pick":
How to make easy foam rubber stamps

My four year old has gotten big into making cards and such "just like mom." She would LOVE these home made stamps from The Silly Pearl. I'm totally saving this as a summer rainy day activity.
 
Please Remember to...Follow ALL 3 hosts.
Post our fabulous button on your blog so others can join the fun. (its on my sidebar)
Visit a couple of the other links and spread some love. We all love comments :)
For all projects linked to the “Pined it, Made it” category, please ensure you link ONLY projects you were Pinspired to create and that the original post that inspired your project is properly sourced. We want to play nice :)
For the “Everything Else” category, please do not post giveaways, items you’re selling or other link parties.
Pin-ed It, Made It: Everything Else:

Thursday, May 24, 2012

Pin-ed It, Made It 05/25


Not every Pinspired project works out as planned…
Pinned Image
…But we hope that you’ll link it up anyways!

pined_it_made_it_button175x175
Your hosts are Brandi & Meig from Crafty Girl Squared, Melanna from Rhapsody of Cacophony& Jennifer from Finding My Way in Texas

Now on to the Features!

Top Viewed This Week:

Mirror Turned Chalk Board from I Should Be Mopping the Floor!

Meig & Brandi’s Top Pick:

Our favorite link up is the Nutella Fudge Pops from Heather's French Press! We LOVE fudgecicles AND Nutella. Putting them together is a great idea!!

Melanna’s Top Pick:


Maybe it's because I've have 2 girls, but I LOVE me some hair bows. I'm totally in the mood to make some of these super cute felt ones. And lucky for me (and you!) Sarah at Crafting and Creativity just posted the tutorial!


Jennifer’s Top Pick:


I love my crock pot! And so does Cynthia from Eating in Neverland :) I think this is a recipe that even my picky eater of a husband would like!

Please Remember to...

Follow ALL 3 hosts.

Post our new and fabulous button on you blog so others can join the fun. (its on my sidebar)

Visit a couple of the other links and spread some love. We all love comments :)

For all projects linked to the “Pin-ed it, Made it” category, please ensure you link ONLY projects you were Pinspired to create and that the original post that inspired your project is properly sourced. We want to play nice :)

For the “Everything Else” category, please do not post giveaways, items you’re selling or other link parties.

Pin-ed It, Made it!:

Everything Else!:


Tuesday, May 22, 2012

Ragged Butterfly Place Mat Tutorial

Here is the promised tutorial for the Ragged Butterfly Place Mats. There is nothing that is particularly hard about them, but I did find them to take some time (though I also did 10, so it may have just FELT longer!).


I started with a basic butterfly shape. I got mine from the Silhouette online store, but I'm sure you could draw one or use any butterfly clip art. I drew a line down the centre (the middle of the body) so I knew where the halfway mark was.

I sized it so that half of the butterfly filled a vertical (portrait) page. I printed this size and then I shrunk it so that it was about 1/2 inch smaller all the way around. I had to stretch out the wings a bit in order to make the body small enough, but basically you just want a 1/2 inch smaller butterfly as even as possible all the way around (but it doesn't have to be exact).

Once I had printed my butterflies, I cut them out of the fabric that I wanted to use. Use the large butterfly for the outer fabric and the smaller butterfly for the batting. Since you only have half a butterfly, you'll need to place it on the fold. To get better mileage from my fabric, I folded both edges into the centre fold line (and then I was able to cut 2 at once).


I was going with the birthday colours. 8 of the 10 that I did I made pink on one side and purple on the other. 2 of them (for the boys) I made green on both sides. Then for the circles (my butterfly shape came with them) I cut out the small ones all green for the girls (both sides) and opposite pink and purple for the big circles. On the boys I did one side with large purple and small pink and the opposite side was the other way around. It really doesn't matter what colours you use or how you do the dots.
For the 10 place mats I did I had:
8 pink butterflies
8 purple butterflies
4 green butterflies
20  purple large circles
20 pink large circles
4 purple little circles
4 pink little circles
32 little green circles

Cut the smaller butterfly (1 for each mat) out of the batting. I used a thin batting. I have no idea if it has a special name as I got it on a bolt. I just asked the girl at the store to help me find the cheapest and thinnest batting they had.

Once you've got everything cut out it's time to layer it.


Take one of the fabric butterflies, right side down, then place on some batting (centering it), then place the opposite colour fabric right side up. I then placed on my circles, being careful they are more or less in the same spot on the opposite side (I used my fingers to pinch the feel along the outer edge to gauge how close I was. Not all were perfect, but most were good enough). Pin in place.


Using a straight stitch sew around the circles (remember to back stitch) leaving about a 1/2 inch seam allowance. With your needle down lift your presser foot to help swivel around the circles. Again, these don't have to be perfect.

Starting 1/2 inch in from the edge, sew two straight lines on either side of the body of the butterfly. Stop 1/2 inch from the bottom edge (otherwise you won't have anything to fray!). This stitching helps tack everything in the middle down and gives definition to the butterfly.

Then sew around the entire body leaving a half inch edge (I realized after the second line down the centre by the body, you can leave your needle down, turn the butterfly and start sewing around the edge from there).
(if you look closely on this picture you'll see that some of my stitches got too close to the edge. You don't want that because it makes the next part not work as well)

Once you have sewn all the way around, take some snippers (they're the spring loaded scissors, also called ragging scissors) and snip all the edges and around the circles too, about 1/4 of an inch apart. Careful not to clip your stitches! You can do this with regular scissors, but it's very tiring on the hand. I found this to be a good TV watching exercise.

Once you're done throw them in the washer and dryer to help the fringe to curl and look all ragged.


That's it, you're done!


Monday, May 21, 2012

Ragged Butterfly Place Mats

 
It isn't very often that I get a new idea. Like totally new, not copied from anyone.

Usually I see a project that inspires me and it's purely just an "I want one too" kind of thing and I make an exact copy (or a wonkier version, but with the idea of a copy...)

This project was different.

I was thinking through all the details for Madelyn's upcoming birthday party and in thinking of the table decided that I needed place mats (for those of you who don't know me, that's a big deal. I'm pretty anti-place mat).

I got it stuck in my head that I needed butterfly place mats. In the birthday colours (of course).

However, I knew that finding them randomly in a store was probably not going to happen, so that meant I would have to make them.

At the same time, this entire month I've been helping make ragged quilts with the ladies at my church, like this:
Source and tutorial
I'd never done anything like this and it's been quite fun learning the process (which is surprisingly very easy). Well, I must have had the style idea on the brain because when I was thinking about how to piece together my butterflies, this process came to mind.

And then I couldn't shake the idea. I HAD to make these. 10 of them to be exact.

So over the weekend, that's what I did. I'll post the tutorial tomorrow so you can make some too. I think they would be a fun gift to give a little girl for a tea party place setting or something. And you're not stuck at butterflies, basically any fun shape would work.


What do you think? There'll be lots more party stuff coming up pretty quick in the next week or two!


Saturday, May 19, 2012

Bonus Blogapaloosa!

 So what happens when more than 14 bloggers want to be part of blogapaloosa??

You get a bonus chance to win! That's right a 15th giveaway. Woot!

This one is hosted by Michelle at Michelle's Little Piece of Heaven. Here she is:


Hey everyone it's time for another giveaway. This time I am giving away a DIY book. It has a lot of good ideas from green houses to cold frames. If you have chickens, it has plans for that too. Just leave a comment to win at Michelle's Little Piece of Heaven to win


Blogapaloosa Day 14 - Atir Inspired Decor *Updated*

It's the last day of Blogapaloosa. Kind of sad, hey? I've had a ton of fun and I hope you have too and that you've found some great blogs and sweet prizes to win.

Our final host is Nina at Atir Inspired Decor. Here is what is up for grabs in Nina's words:

*updated: Somehow I missed some of the code to this post, so you didn't get to see ALL the goodies. So here is the complete list.


Yeah, to day is my day. I am I so happy you stopped by to check out this treasure chest of a giveaway that you just might win! I agonized for days about this giveaway & what I wanted to giveaway since I have never done this before, I thought I wanted to add items that I would use & were related to my blog; home decor, thrifting, DIY, Cooking & Fashion.  Here is what I came up with:


I had this piece of beautiful fabric on hand, maybe used for a bulletin board~
A Lovely Scented Candle~
Butterfly Drawer/Door Pull~
Paper Flower for a wreath, gift or as an accent on a vase~
Small Frame, these take paint so nicely, should you care to change the color~
Cupcake Bath Salt after a day if DIY'ing
A Nice Book to cuddle up with~  
                                      
Necklace & earring set, to make you feel more beautiful than you are~
This was my thrift store find, a new wallet~
Add some bling with these~
Ball of Lip Gloss~
I believe in the written word, Note Cards~
Craft Paint & Decorative Ribbon to get your creative grove on~
Decorative Serving Dish~

So come on over to 

Thank You & Many Blessings

Nina

Here is the list of all the hosting blogs for Blogapaloosa, in case you missed any or want to check to see if you've won!
Day 1 - Randee's Organized Chaos  for the "Bling Bling Hide and Sole" flip flops
Day 2 - Was right here on my blog for the Pink Lemonade Apron and Chef hat set with matching Recipe Cards. 
Day 3 - Second Chance to Dream  for the $20 Amazon Gift Card
Day 4 - Finding My Way in Texas for the $20 credit to her online store LoneStar Lovlies and the cute little gold fish pouch
Day 5 - A Jennuine Life - Custom Reversible Pinafore 
Day 6 -  Mammy Made - Purple Gingham Bow Tie OR Apron Skirt
Day 7 - Little Sprinkle of Fun - Flat Iron Case
Day 8 - The Grubery  - Eat This Not That Restaurant Survival Guide book and a $5.00 gift card to Jamba Juice!
Day 9 - Modern Yet Old-Fashioned - On the Go Giveaway: Sport Mixer Blender Bottle and bars
Day 10 - Measured by the Heart - $50 to Pick your Plum
Day 11 -  Claiming Our Space - Travertine Tile Coasters and Magnets
Day 12 - Don't Mess With My Tutus! - Annie Sloan Chalk Paint Gift Basket
Day 13 - Inside My Present - $20 Gift certificate to UUPP Print Etsy Shop


Friday, May 18, 2012

Blogapaloosa Day 13 - Inside My Present


Inside My Present is the host of today's giveaway. Check it out!

The winner of my giveaway will receive a $20 gift certificate to UUPP Prints Etsy shop! UUPP has fresh, inspirational prints displaying anything from a Julia Child or Jane Austen quote to an endearing message for your sweetheart! Here is one of my favorites: 
You'll find this giveaway at Inside My Present! See you there!


Here is the list of all the hosting blogs for Blogapaloosa, in case you missed any or want to check to see if you've won!
Day 1 - Randee's Organized Chaos  for the "Bling Bling Hide and Sole" flip flops
Day 2 - Was right here on my blog for the Pink Lemonade Apron and Chef hat set with matching Recipe Cards. 
Day 3 - Second Chance to Dream  for the $20 Amazon Gift Card
Day 4 - Finding My Way in Texas for the $20 credit to her online store LoneStar Lovlies and the cute little gold fish pouch
Day 5 - A Jennuine Life - Custom Reversible Pinafore 
Day 6 -  Mammy Made - Purple Gingham Bow Tie OR Apron Skirt
Day 7 - Little Sprinkle of Fun - Flat Iron Case
Day 8 - The Grubery  - Eat This Not That Restaurant Survival Guide book and a $5.00 gift card to Jamba Juice!
Day 9 - Modern Yet Old-Fashioned - On the Go Giveaway: Sport Mixer Blender Bottle and bars
Day 10 - Measured by the Heart - $50 to Pick your Plum
Day 11 -  Claiming Our Space - Travertine Tile Coasters and Magnets
Day 12 - Don't Mess With My Tutus! - Annie Sloan Chalk Paint Gift Basket


Thursday, May 17, 2012

Pin-ed It, Made It Link Party 05/18

Welcome to the Pin-ed it, Made it Party! We’re so glad you’ve joined us for some good old fashioned linky fun :) We are all so happy to see the party growing! Thank you to everyone that posts our button and spreads the word!
pined_it_made_it_button175x175
Your hosts are Brandi & Meig from Crafty Girl Squared, Melanna from Rhapsody of Cacophony
& Jennifer from Finding My Way in Texas
Now on to the Features!
Top Viewed This Week:


Meig & Brandi’s Top Pick:

We love the June Bug Dress made by Little Rays of Sunshine! It's such a sweet dress, the colors are great and since Meig is a red head, we're always a sucker for a redheaded little girl. ;)  

Jennifer’s Top Pick


I love wrapping presents and I Love Super Heros! Why not combine the two like Jenn from Making Fun!?!?! :)


Melanna’s Top Pick:

I'm totally in love! I will now be on the hunt for damask tissue paper so I can make this for my Christmas wreath.  Thanks Lindsay for showing us how you did it. Check out the tutorial at Artsy Fartsy Mama.

 
Just a Reminder:
  • We’re no longer doing separate feature posts! The features will be posted right here before the link up every Friday. Each host will be picking their fav link and I will also be posting the Top Viewed link.
  • There will now be TWO categories! Pined it, Made it & Everything Else! That means that this party is now open to ALL projects! :)
    Please Remember to...
Please follow ALL 3 hosts.
Post our new and fabulous button on you blog so others can join the fun. (its on my sidebar)
Visit a couple of the other links and spread some love. We all love comments :)
For all projects linked to the “Pined it, Made it” category, please ensure you link ONLY projects you were Pinspired to create and that the original post that inspired your project is properly sourced. We want to play nice :)
For the “Everything Else” category, please do not post giveaways, items you’re selling or other link parties.


Pin-ed It, Made It:
 
Everything Else: