Showing posts with label Quiet Book. Show all posts

Friday, December 10, 2010

Mady's Quiet Book

Done, Done, Done!


Do you hear that sound? That "Awwww" of angels singing? That's because it is a special day. This is the day (and the post!) I never thought would come! It took 4 months, but I have officially (finally!) finished the quiet book. I'm so proud of myself for pushing through, even when things weren't working and getting it done and actually finishing it before Christmas (because who are we kidding? If it wasn't done before Christmas it never would have been finished).

I went to my parent's house last weekend and my mom helped me measure and cut the fabric for the cover. Then I came home and cut the felt letters and sewed them on. This proved to be tricky as the striped fabric didn't have straight-dyed stripes. That totally messes with you sewing straight lines, let me tell you.

I decided to zig-zag around each letter to fasten it down better and though I'm very new at the whole zig-zag thing, I'm pretty pleased with how it turned out.


I had originally planned to make the fastener to close the book be three buttons on the front page and then a loop of elastic on the "tab" so that no matter how big or small the book was (if I took out pages etc) then there would be a button onto which it could fit. However, my wording ended up being bigger than I thought and I didn't have to space for three buttons in a horizontal line. So then I thought I could do it the other way with the buttons on the tab, but then there was no way to put the elastic through the bias binding without it being weird. So then my next plan was a single button on the cover and three button holes on the tab. The first button hole I made, turned into a mess (I wish I knew what causes this problem so that I could fix it!). And out of frustration I declared that I would be doing a simple snap. And I'm glad I stuck with that.


The cover itself has quilt batting inside to make it a bit more durable and a bit more soft. To make the "binding" part of it, I used belting and stitched little "channels" for the rings to go through. The belting then comes around and was inserted into a tube of fabric that I made to cover it and then stitched down to make a handle. If you want clearer instructions on how to do that send me an email, comment or if you know me personally give me a call and I'll walk you through it.


Lastly I put bias tape around the edges to finish it off nicely and to save me the whole "fold this under a 1/4 inch" thing. I'm into simple, people!

The cover as a project would have intimidated me had I looked at it and decided that was what I had to do, but doing each part step by step made it quite simple. Kind of makes me think I really could take on a harder project. Now I just need to decide what. Any ideas?


Below is a picture list of all the pages and the skill they teach as well as a link to the post where I explain them a bit more. Of course, if I didn't explain something and you want more detail, please let me know and I will further clarify.

If you're wanting to make a quiet book, I recommend doing 10-15 pages (not 26 like me). And check out this site for some great ideas and links to other blogs with quiet books. I used some of her templates and ideas for some of the pages you see here.


(See? I wasn't kidding, the thing is huge!)

Well I'm going to go wrap it now before a certain someone finds it!


1. Giant Pocket (holds extra dress up clothes and whatever other treasures she wants)
Skill Learned: Buttoning


2. & 3. Potato Head and Pocket/Clothesline
Skill learned: Clothes pinning, Creative/Imaginative Play, Face Structure


4. Teddy bear
Skill learned: Bow Tying


5. Picnic Setting
Skill learned: Doing up a buckle, table place settings


6. & 7. Count the buttons
Skill learned: Counting, patterns


8. Hair
Skill learned: Using barretts, hair elastic, clips, braiding etc.


9. Apple Tree
Skill learned: Hooking, unhooking


10. Ladybug
Skill learned: zipper, snaps


11.Counting Beads (though 2 pages are shown, I only ended up putting one in the book)
Skill learned: Counting


12. & 13 Oven & Cupcakes
Skill learned: Imaginative play


14. Shoe
Skill learned: Shoe lacing/tying


15. Matching Shapes
Skill learned: Matching colours and shapes


16. Weaving
Skill learned: Weaving


17. Tic Tac Toe
Skill learned: Logic


18. & 19. Get Dressed
Skill learned: Imaginative play, outfit coordinating (ha! here's hoping)


20. Yo-yo
Skill learned: Up/down


21. Puzzle
Skill learned: Logic, patience (these are hard!)


22. Ice Cream Cone
Skill learned: Sizes (small medium, large)


23. Clock
Skill learned: Time telling (analog/digital conversion)


24. Telephone
Skill learned: Imaginative Play, how to make a call


25. Button Flowers
Skill Learned: Buttoning, colour matching


26. Traffic Light
Skill learned: Colour recognition, Traffic control meanings

Thursday, December 2, 2010

Hair and dress up

Well these are the last few pages. I'm so excited that this book is nearly done! Here's what I just spent the last hour doing:


I'm in the middle of putting the grommets through all the pages and then I just have to make the cover. I'm so proud of myself for not stopping such a big project halfway through. Now to just push through to the end! But I'm getting ahead of myself.


Dress Up


(this one I took when I was pinning/placing things and forgot to take one after everything was sewn down, so just pretend the pins aren't there)

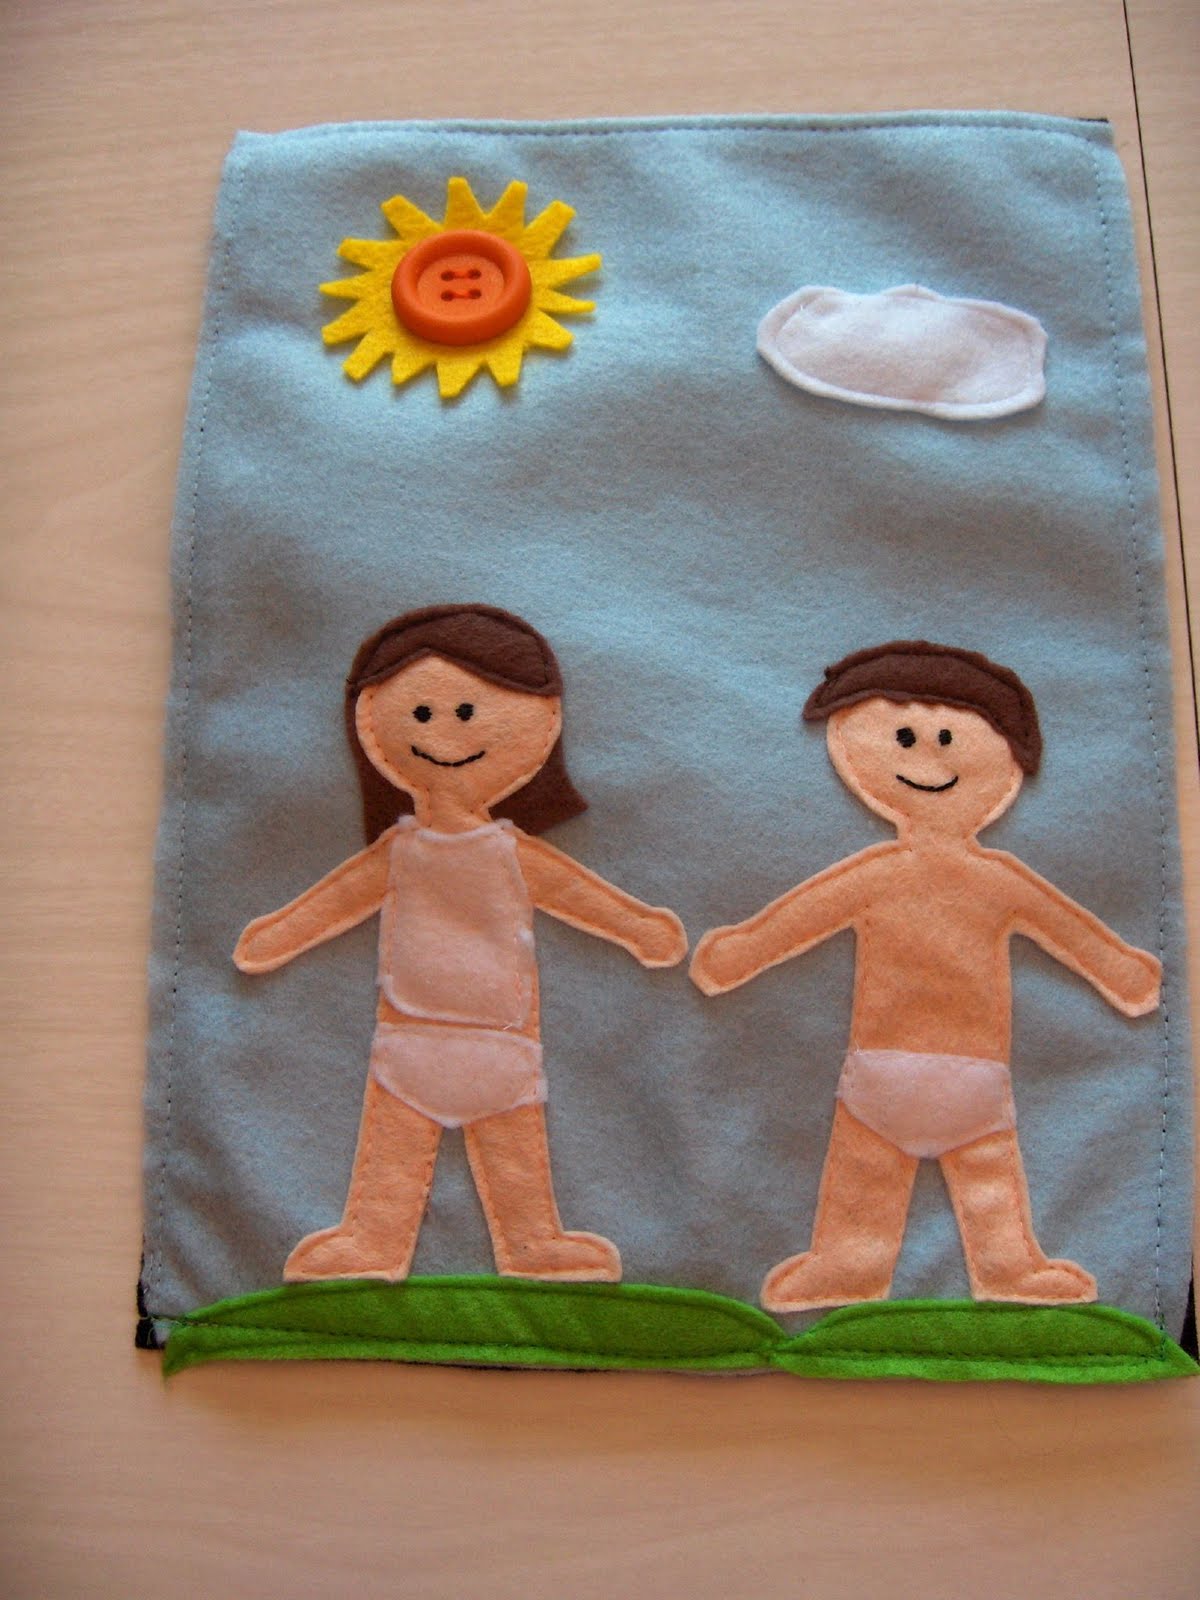
These pages were on hold while I looked for flesh coloured felt. My sister found some in her tiny town and sent it my way. I used a paper doll pattern found on-line but then scaled down so that I could fit two people on the page. I made a bunch of clothes and did them double thickness in different felt for more clothing options.


All the clothes can clip onto the clothesline (tip: thread the string through the spring in the clothespin so it doesn't get lost)


but I also made this pocket at the front of the book since these are hard clothespins to work when you're 2. I figured she could use the pocket for all sorts of goodies.


(I'm well aware that my button is not truly centred. Remember how I'm still learning how to use my buttonholer? Ya, part of that "still learning" is figuring out how to centre the thing.)


Hair


I'm totally in love with the hair page. I found the face online, but the search program I was using didn't tell me the source, sorry, but I have it saved if you want it. The body is a pocket that will hold hair clips for all the hair dressing needs of a little girl.


So those are all the pages I've done. There are SO many more that I have found around blog land that I wanted to do, but when you see the size of this book when the pages are all stacked you'll understand why I had to stop. Some of them are just so good though that I may have to do some extra pages to swap out in the future. You know, for Kate.

Monday, November 29, 2010

Flowers, Ladybug and a clock

So these three pages I thought were going to be the death of me. They're not HARD per se, but let's just remember that I'm still (re)learning to sew. And apparently embroider.


Clock

Let's start with the clock. It was all going so well until I realized what I did wrong with the numbers. I had done 12, 1, 2, 3 and then started thinking ahead. Uh Oh! Do you see it? Take a second if you don't right away.


I had started facing my numbers to the centre. Had I continued in this fashion my 6 would have looked like a 9. I'm not good, or fast at embroidery so instead of pulling it all out, I cheated and turned the bottom half of the clock's numbers. Then I Googled to see if there were any real clocks that are done this way. There aren't. Just so you know.

I used real clock hands (I got mine from Lee Valley Tools) and layered them on the felt that had a tiny grommet (used for scrap booking) through the centre. I couldn't find a brad big enough so I used a scrap booking one as well. The prongs of the brad were getting caught on the felt of the clock (but not the background) so I cut a piece of plastic from a yogurt container lid and inserted the brad through that after going through the grommet on the clock face. Then I stitched the whole thing to the page.

The pocket below the clock is going to hold cards with digital times on them (and then an analog clock on the back showing the correct way to show the time). This was my sister's idea (Thanks Jenna!) so that kids will learn the fluent "conversion" of how to read both times. I found a free font on dafont.com called Digital-7 that looks like a digital clock that I'm making the cards with. I'm starting with times on the "15" increments and as she masters them I will add/switch them for more difficult times.


Ladybug

The Ladybug wasn't a hard page except I'm using a machine that was my Grandma's. She never showed me how to use it. So I had to figure out which was the zipper foot (which involved multiple phone calls to my mom and a Google search for the machine's manual) and then the new presser-foot messed up my tension (or a certain 2 year old!) and it just made for a long afternoon. Once that was all sorted out, it went pretty quick. The spots just snap onto the body of the bug and are stored inside. I found the picture on-line months ago. Sadly I don't have the site to credit, but I have the image if you want it as a template, so let me know.


Flower Vase

Oh the grief of this page! The vase, stems and buttons were easy. Even the flowers weren't hard to make. Just those button holes! And my machine's tension was acting up, so that didn't help (turns out it needed oiling and there was some user error involved too). I have a button-holer attachment that makes it really easy to make the holes. Once you get the crazy thing on! And then I had to switch the colours 5 times. I was more than slightly annoyed by the end of it. But I got it to work and I'm quite pleased with the result. I love the vase. I found the spotted felt at a dollar store (along with the pink leopard print used on my phone). I think it just adds a bit of fun to the page.

Just a tip if you do this page. Use interfacing in your flowers so they don't overstretch!


So those are my latest pages. 3 more to post and the book is done!

Thursday, November 25, 2010

Cupcakes, Ovens and Picnics

I know its been a little quiet around here. I've been madly working to get the quiet book pages done. I'm one of those people who works well under pressure (in fact, I often need it to be productive), so I have to make self-imposed deadlines (do you do that?). But it worked out for me because as of this afternoon I finished! So now I just need to post all these pages. And stitch them together.


Cupcake Oven


The cupcake oven was a page I saw here, and fell totally in love. Mady loves to pretend to be a chef. And she loves parties. So I knew she would love an oven with cupcakes to bake. My sister designed the oven, so I can take no credit for it. And I didn't have thread in this colour of pink, so I decided I would be all fun and do a contrasting colour. Forgetting that it means all mistakes/not pretty parts, are very visible. Whatever. This book is my "learn to sew" project, so I'm over the whole trying to make it perfect thing. So don't judge the stitching, just enjoy the cuteness!

Oven:


Cupcakes:


The window of the oven is a piece of vinyl so you can see inside. And the cupcakes are on a grey cookie sheet. Okay, so you have to use your imagination, but it gives the illusion, right?? I didn't make the cupcakes, I found them at Michaels. They have sticky backs, so I just stuck them to another piece of felt. And then the "wrappers" on the tray are just slightly bigger so that they are little pockets for them.


Put the cupcake in the oven:


Picnic Basket


Mady's favourite way to consume food in the summer is via a picnic. We have also recently started to teach her how to set the table. She can get the correct items to each person's spot at the table, but we're still working on placing them nicely and in the correct order. So, when I saw this picnic page with the table setting, I had to add it to the book (do you see how its so easy to make so many pages??). I followed her tutorial on how to make the page, but I made my own patterns, using hers as a general guide.

I traced some play kitchen utensils to make the fork, knife and spoon and traced a little plate from my own kitchen for the plate. That meant my basket needed to be a bit bigger than the pattern. I also went in search of the smallest buckle I could find. This was it, so I needed to make a basket that could fit the stuff, and looked right for the size of the buckle. It all barely fits on the page, but in the end I was quite pleased with it all.


And that's it, for now. I'll post the rest of the pages I finished over the next few days. And then we will have a break from the quiet book posts while I stitch them all together.